Chutneywale Aaloo- Baby Potatoes in chutney

I thought I would do a quick post to tell you about a recipe I just created off hand.

Not really a planned recipe neither is it something gourmet; but this one makes it to the blog simply on the fact that when I seen the plate and tasted the food, it made be smile. I smiled because I saw myself on the plate. This is just the way I like my food, clean, simple and something that isn’t too complicated.

The other day,  I decided to do dinner.  It was a long day at work and I really didn’t have the bandwidth to run the entire distance.  So, I decided to make something quick and easy.  I checked to see if what the refrigerator had in store. I saw a few boiled baby potatoes from an earlier cook in the week,  there was some  green coconut chutney and cheese along with some other pantry essentials.  I thought to my self if I could simply fry the potatoes and use the chutney to just coat the potatoes.  This idea came from the chutney and cheese sandwich that is such a famous Street food here in Mumbai.  You have the option of adding in boiled potatoes to the sandwich if you please.  All in all,  like the joke goes this dish is just the good old chutney cheese sandwich that I sent to post graduate school 🙂

I loved the final result and so I’m sharing it here for you to try.. Try getting a little more adventurous and experiment  with some roasted chicken.  It should work. Or may be even boiled eggs. To be frank, I didn’t use a recipe that has actual measurements; like i said earlier, it was created on the fly. I used my eye to guide my hand into what went in the pan.

Let me know if you did and how you liked it. I’d be glad to hear from you.

 IMG_20161008_185822.jpg

Here is how to go about it.

Method:

  • I used about 8-9 pre-boiled potatoes. If you are beginning from scratch, just pressure cook the potatoes for just one or one and a half whistle. They should be about 80% done.
  • Once done, peel the potatoes and with your thumb, gently press the potatoes so that they crack. Don’t be too hard, you just need to create a crack so that the chutney seeps into the potatoes.
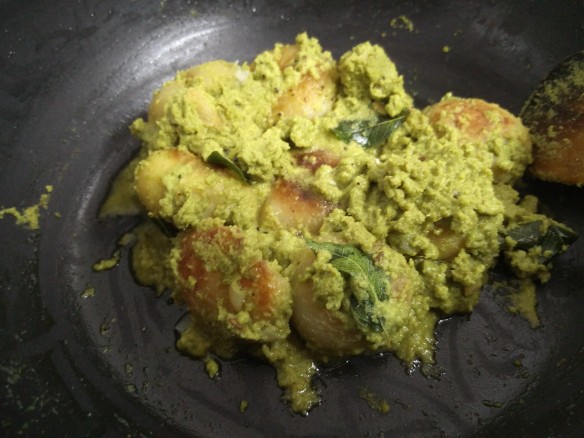
  • Now fry the potatoes in some vegetable oil till they are golden brown all over. Just before the potatoes get done, season them with some salt and pepper.
  • In the same pan, add some butter (please use only butter and not anything else). Add 5-8 curry leaves and once they splutter add half a teaspoon of cumin seeds.
  • Now add the chutney and some salt. Add just a little water to adjust to your desired consistency.
  • Once the chutney reaches a simmer, add the fried potatoes and mix gently so that the chutney coats the potatoes evenly. Season with salt and pepper to taste.
  • Grated some cheese and give it a mix. I used parmesan. You could use cheddar or parmesan or even the Amul cheese block if you please.
  • We had it with Malabar parottas.

Note:

I used chutney that I had available with me. If in case you’re planning to make chutney fresh, here is a quick recipe.

  • Grate together one coconut/ 1 medium onion, chopped/4-6 garlic cloves/ 1 small piece ginger/ 3-4 spicy green chillies./ 1/2 tsp of cumin seeds.
  • Put all together in a blender and grind with a little water till it is a homogenous paste of pouring consistency.
  • Season with salt and pepper and drizzle with lemon juice before serving.


Kheema Pao- Like the ones at the Irani hotels.

I am a very happy man as i write this post.

That  sort of happiness that you get when you achieved something after multiple attempts. What did I get? Well, I cracked the code for recipe for Kheema Pao or simply mince and bread. I know its not that difficult to make mince and bread. We Mangalorean have a recipe we make all the time and so do the Goans. I like those as well; but honestly, I love eating mince the way it is prepared at the Irani hotels. I first tasted this way back during my college days. I studied at St. Andrews College in BAndra. Now, Bandra is blessed with some lovely options for eating. Right from high end, plush five stars to non-descriptive place that you would enter if you you were to go by the eye. A few furlongs away from college was one such Irani hotel. With the meagre resources at our disposal those days, eating out was a luxury. But this Irani hotel was one place we visited once on a while, to  celebrate a birthday in the group or simply the fact that we had cleared our semester without any backlog. Truth be told, i don’t really remember how, when and why I ordered Kheema Pao the first time (I wasnt a food writer) but i remember falling in love with the way it was made. There was something about it; nothing earth shattering but something warming and comforting. See, that is it about food being simply cooked; it touches your soul.

Post college, life happened. I for quite a while worked at Churchgate, Mumbai’s CBD and home to quite some Irani cafe’s. We would step out for lunch ocassionally and at times a mid morning snack. Quite often, I’d tuck into the kheema pao. Surprisingly, the dish seemed quite similar except for a slight variance in spices. A few attempts to create the similar dish at home failed. I was advised  by folks at home to stick to the mangalorean recipe which was  best. But thats also because we Mangaloreans are a grumpy lot when it comes to recipes. Any other recipe than the one you or your mother has is bound to be an absolute failure.

Now, some days back I happened to be in Bandra and I passed the Irani hotel. I was delighted to see it still there and doing brisk business. I decided to grab a bite more out of nostalgia than hunger. What did I order? Well you could take a guess. Did it taste the same. Of course. Nothing has changed. I tried my luck and called the guy who attended me. I wanted to know the secret of this recipe. “Is mein kyaa masale padte hain?” (what masalas do you put in this) I questioned. He gave a blank look, then looked up to the ceiling fan moving slowly as a protest at being made to work in his old age. Finally, he answered vaguely “Sab masalo ka taste aana maangata hai” (You need to taste every masala). Well, not entirely, but some part of the riddle had been solved. I was competent enough to try it out once again. One thing that I observed, in common is the garnish of fresh ginger and green chillies. I loved the sharpness from the ginger and the heat from the chillies. Its not really a very spicy dish. The spices are more supporting actors to the medley of mince and onions.  Please don’t skimp on the oil, you need to have that circumference of oil around your mince. That is where the real taste lies.

It was a very simple dinner but I went to bed a very happy man. I also kept some aside for the next days breakfast and boy, my day was made.

One more request, please have it with bread and only bread. Anything else, would kill the romance of this dish.

IMG_20161008_123112.jpg

Kheema Pao

  • 450 grams mince (I used chicken. You could use mutton or lamb)
  • 100 grams green peas (optional, I didnt use)
  • 100 ml unflavored vegetable oil
  • whole masalas ( 4 cloves, 4 cardamom, 3 sticks of cinnamon, 1/2 tsp cumin)
  • 5-6 cloves garlic, minced
  • 1/2 inch piece of ginger, minced
  • 2 green chillies, finely chopped
  • 2 small onions, finely chopped
  • 1 medium tomato, chopped
  • Powder Masalas (1 tbsp red chillies, 1/2 tsp turmeric/ 1/2 tsp garam masala/ 1 tbsp corriander [for garnishing])
  • Salt and pepper, to taste
  • Juice of half a lime
  • For Garnish (A Few sprigs of corriander, finely chopped/ 1 1/2 piece of ginger and 2 green chillies, roughly chopped)

Method:

  • Heat oil in a pan. When it is medium hot, add in the spices and let them splutter.
  • Once the spices begin spluttering, add in the ginger, garlic and chillies and cook till fragrant.
  • Add in the onions, and let them sweat till translucent. Dont entirely cook the onions.
  • Once the onions are slightly pinkish, add the tomatoes and cook till soft.
  • Add in the mince and the green peas (if using). Cook for 5-7 minutes.
  • Take some water in a small mixing bowl, add in all the powdered masalas and add it to the mince. Give it a good stir and mix well so that all the masalas and meat integrate well.
  • Add in the salt and pepper. Cover and cook for another 8-12 minutes.
  • Check once if the meat is done. If done, add the corriander powder and give it a good mix.
  • Once meat is cooked. Add the lime juice, and the corriander leaves.
  • Add the chopped ginger and chillies and serve with toasted bread (if you like)
  • Done. 🙂


Mutton Sukkha and the joys of simple cooking.

Many a time we tend to complicate the simple. Like I was in my attempts to write this post. This post is about a dish so simple, I doubt it would make it to the blog, leave alone a restaurant like they say on Masterchef. Let me tell you what happened.

I cooked a very simple mutton sukkha dish some time back. The idea was to cook ourselves a light meal and that is it. So, we got some meat and and i decided to cook it in sukkha style. Now, to be fair; this is not an original sukkha recipe. Of course, I have Mangalorean blood in my veins and a sukkha recipe is sacrosanct. The fact is that there are different variations of sukkha among the different communities in Mangalore and this one a honestly, a little bit of this and some bit of that. Coming back to the dish, I couldnt be more proud of what i cooked that evening. Many many years later, if you ask me to recount my top 5 dishes, I’d reckon this would be among the top two. Such simple, rustic and homely flavours. ‘Simple is beautiful‘ couldn’t be truer.

Once the dish was made, I tried writing a post for it. but couldn’t. Somehow, I couldn’t relate the post and the blog. And as I was thinking how to resolve this, I received a longish watsapp which went like this. “Have you ever noticed how despite having coffee at the most premium places, you enjoy your cup of cutting chai with your friends at the college canteen. You probably move around and rub shoulders with the who is who of your field; but you feel warm in the embrace of  your loved one”……. So you see that is what simplicity does to you. It makes you warm withing your soul, takes you back to where you belong. A place you call your own.

I really dont want to complicate things much by rhapsodizing about simplicity. I would rather leave you to enjoy the recipe.

Mutton Sukkha

Mutton Sukkha

Ingredients

  • 500 grams, mutton on the bone
  • 100 ml coconut oil (please don’t use any other oil)
  • 15-20 curry leaves
  • 1 medium onion, finely chopped
  • 10 pods garlic pods, crushed
  • 1/2 inch ginger, crushed
  • 2-3 green chillies, roughly chopped
  • 1/2 teaspoon cumin seeds
  • 3-4 tablespoons  of crushed pepper
  • 150 grams of grated coconut
  • salt to taste
  • coriander leaves and juice of lime for garnish

Procedure:

  • Wash the mutton and keep aside.
  • In a deep bottomed pan, heat the oil and add the curry leaves.
  • Once the curry leaves start spluttering, add the cumin and onion and fry till the onion is light brown.
  • Add the garlic, ginger and green chillies and fry till garlic is reddish brown.
  • Now add the mutton and fry well in the oil. The oil must coat the mutton well. Cover and cook for a while till mutton is almost done. This should take about 20 odd minutes depending on the quality of the mutton.
  • Add the salt.
  • Lastly, add the coconut, pepper and mix well so that the mutton and pepper integrate well.
  • Garnish with lime juice and corriander and serve with rotis or neer dosas

Mangalore Memories and my take on the Mangalorean Fish Fry

They say when you travel, the journey ends; but the memories still remain.. Around this time, last year; I made a trip to Mangalore. Since this was a trip after quite some time; I had jotted down a few things to do and of secret recipes I wanted to learn. That decided, I began my Mangalore sojourn.

So while most of the items on my ‘to-do’ checklist got ticked off, one of the most difficult to pull off was trying to source authentic recipes. When it comes to recipes, we Mangaloreans are a thrifty lot. We find it very difficult to part with our recipes. Even if some kind aunt would share her secret recipes, it would be “illehse te ghaal re” (put a little bit of that, son) or “Don oondi yeh ghaal” (put in two fistfuls of this) leaving the poor apprentice with absolutely no choice but to assume what exact measures are ‘illehshe’ and ‘don oondi’. Nevertheless, I did source some authentic ones. Some of which I have already posted; some which I am yet to perfect and will then publish.

By now, I have told you numerous times, how much a Mangalorean loves his silverware, I mean fish and not the metal. Today’s recipe too is something I learnt and ate in Mangalore. The fish fry is a very common item on lunch menus across homes; usually accompanied by steamed rice and some kind of a vegetable gravy. Now, traditionally, fish fry is made by simply marinating the fish in spices along with vinegar and then frying it in oil. I had this version at a restaurant and pretty much liked the idea of enclosing the fish in a banana leaf. My take on this was to add a stuffing inside the fish and what better than the all time favorite, coconut.  Don’t be appaled by the picture and think the fish is burnt. Let me assure you its not. This kind of frying is popular across southern India. Only the skin, gets the dark tan, but the flesh inside is succulent and sweet with a cushion of spicy coconut filling.

On a hot summers day, fried fish and beer… “Anee kaleh zai” (what else would you want) as they say in Mangalore.

IMG_2374

Mangalorean Styled Fish Fry

Ingredients:

For the fish

  • 1 medium sized pomfret (or any firm fleshed fish)
  • Juice of 1 lime
  • 1 teaspoon, red chilli powder
  • 1 teaspoon, turmeric powder
  • Salt to taste
  • Oil -sufficient enough to fry the fish
  • 1 banana leaf, sufficiently large to completely encase the fish

For the Filling

  • Half a coconut, grated
  • 2 green chillies (increase the quantity if you can take the heat)
  • 1 small bunch, corriander leaves
  • 2 sprigs, curry leaves
  • 1 teaspoon, cummin
  • 1 teaspoon, corriander seeds
  • 2 teaspoons, peppercorns
  • Water from the coconut.

Procedure:

  • Wash, clean the fish and carefully remove the insides taking care not to break the fish.
  • Then, using a sharp knife, make 2-3 incisions on the fish, using firm and decisive strokes.
  • Next, rub the salt, red chilli and turmeric powder on the fish and drizzle with lime juice.
  • Now grind to a paste all ingredients mentioned under the head ‘For the filling’ to a smooth paste. Use the water from the coconut to grind.
  • Rub this paste all over the fish making sure to ensure the paste is evenly distributed across the fish.
  • Wash the banana leaf well and rub it dry. Spread a little oil on the inside and place the fish in the center.
  • Enclose the fish securely with the leaf. If required tie it with a string.
  • Now heat oil in a pan till it reaches smoking point. Place the fish in the pan and cover the pan with a lid.
  • Turn the fish after 4 minutes, till the skin of the fish gets charred not burnt.
  • Once done, open the banana leaf and let the fish rest for a while.
  • Serve with whatever you like… I’m sure you’ll love it.


The Soul Satisfying Dal and a mention on Peri’s Spice Ladle.

Very often, a small appreciation and an encouraging word from a friend or loved one can help you get your mojo back. Both happened to me yesterday. Let me tell you how.

My last post on the ‘how to cook that series‘ was almost a month ago. I did try to write in the interim. I cooked and clicked, but somehow, my laptops keyboard and my mind were not on talking terms. I tried writing, but thoughts just didn’t become words. As I sat wondering what to do, my phone notifies me of an new post from one of my favorite blogs, Peri’s Spice Ladle. The title was intriguing. The post was very different from what Peri usually writes. It was a post where she writes about a few of her favorite bloggers. Well, I was chuffed to see my name featured there. Peri’s words just about motivated me to write. Then towards the evening, I was generally chatting with a close friend who reminded me that my last post was about a month ago and that I should write immediately. It felt nice to hear someone egging you on to blog. And so, here I am all set to begin and I promise to write more often.

So what did I make? Well, I made something that is present in almost every lunch and dinner. The humble dal. In terms of Indian cuisine, the dal is one dish that has a dichotomy to it. It is simple to make yet has a certain sanctity to it. So, one might ask. What is it about the dal that makes it so special. Almost everything I’d say.

Want something comforting at the end of a long working day- come home to bowl of soul-ful dal

Convalescing from an illness-  Doctor recommends dal

Feeling like eating something warm on a cold winters day- try the dal

I can go on and on about the role and importance of dal in Indian cuisine. But that’s not the point. The point here is about a dish that we can safely say is like a ‘One size fits all’ and that is what makes it special. I have had the good fortune of travelling across the country and believe me I have never seen a dal being repeated in terms of taste and texture. If I was seduced by the rich kaali (black) dal of the north, the Mangalorean dalitoy had me weak kneed, then cholar dal of Bengal had me intrigued with the complexity of flavours. See, that is what dal does to you. Once you boil the lentils, its almost like an open canvas use your imagination and play with the sweet and sour flavours or go on add any vegetables that you may like. The marriage will work. My word.

Today’s recipe then is found in most restaurants. Though personally, I find its made better in the warm comfort of home. The Lehsuni Dal. Simple dal cooked with minimal ingredients and flavored with sauteed garlic. Paired with stemed rice and a dollop of your favorite pickle. Hmmmm… Gourmet deconstructed.

Lehsuni Dal

Lehsuni Dal.

Ingredients for the dal.

  • 200 grams, yellow lentils (commonly called toor dal)
  • 1 medium onion, finely sliced
  • 3 medium chillies, sliced
  • 2 small tomatoes, finely chopped
  • 1 small piece of ginger, grated
  • 1/2 teaspoon of turmeric powder
  • Salt- to taste
  • 400 ml water

Ingredients for the tempering

  • 3 tablespoons oil (or ghee if your feeling indulgent)
  • 10 pods of garlic, roughly chopped
  • 1 large red chilli (optional)
  • 1 teaspoon red chilli powder
  • 1 teaspoon, cumin seeds
  • 1/2 teaspoon, mustard seeds
  • 1 small sprig of curry leaves.
  • 2 small sprigs of corriander leaves- for garnishing

Procedure

  • Wash the dal under running water until the water runs clear.
  • Next, combine all ingredients mentioned under the heading ‘ingredients for dal’ in a pressure cooker and cook on a medium flame till you hear about 3 whistles. This should take roughly about 15 minutes.
  • Once done, take off the heat and allow to cool for about 10 minutes. Then use a spoon and roughly mash up the lentils.
  • For the tempering, heat oil in a sufficiently large pan and add the curry leaves and the mustard seeds. Once the seeds start spluttering, add the red chilli, cumin and garlic. Stir gently till the garlic gets slightly brown. Don’t over do this as the garlic may get bitter.
  • Then, slowly add in the cooked dal and stir till the dal has begun to simmer.
  • Check for seasoning, garnish with cilantro and serve hot with rice, roti or phulkas.

Black Chickpeas and Ivy Gourd Fugadh

CS2

Nutty black chickpeas cooked in spicy gravy; accompanied by the sweetish Ivy gourd and gently tempered with coconut and jaggery. This is one dish that is close to my heart, the one that takes me back to my childhood every single time, with the taste still lingering in my memory forever.

Though my mum makes this dish often, she confesses to learning it from her mother.  My dear grandmother at whose place I’ve spent many a happy holidays. Even to date, whenever my mum gets black chickpeas; I know for sure what’s on the menu. Every step of the recipe is magical, right from the moment when the chickpeas are pressure cooked to when the masalas are being sautéed and then finally the coconut garnish; food porn if I could call it that. And that’s not all, there is a bit of tradition involved as well.  The 8th of September, is a special day; where Christians celebrate the Nativity of the Blessed Virgin Mary. This day, the menu is special and is called ‘Noven Jowaan’ roughly translated to ‘new meal’; the new signifying that the meal has been prepared from the new harvest as a thanksgiving to the almighty for his graces. The dishes are prepared in series of odd numbers and this one definitely makes it to that spread.

Somehow, very honestly, I had long wanted to post this but somehow didn’t get to do it. It was the only the other day when I headed to a meeting outside office and had to eat a restaurant. I ordered this one and believe me, the beauty of the dish had been massacred. Seriously, nothing pains me more than Manglorean food gone wrong. I decided to come home and  get it done. 

So then, here is a family recipe. Like its made at my home. Try it, garnish it with spices, temper it with coconut and serve it love. My family loves it, I’m sure yours would too.

CS1

Black Chickpeas and Ivy Gourd Fugadh

Ingredients:

  • 200 grams, black chickpeas, refer cooking instructions below in the procedure
  • 100 grams, Ivy gourd, cut length wise
  • 50 grams fresh coconut, grated
  • 50 grams jaggery, roughly chopped
  • 2 medium onions, finely chopped
  • 5-8 cloves of garlic, minced
  • 1 large tomato, finely chopped
  • 3 tablespoons corriander seeds
  • 1 tablespoons, black pepper corns
  • 1 tablespoon, cummin seeds
  • 1 teaspoon, mustard seeds
  • 7-8 Whole red chillies
  • 1 small teaspoon, turmeric powder
  • 1 Sprig Curry leaves
  • 3 tablespoons oil
  • Salt to taste
  • 300 ml water
Procedure:
  • Soak the black chickpeas in 300 ml water overnight or atleast 6-8 hours. Wash them under running water till water runs clear.
  • After washing, pressure cook for about 15 minutes or till you hear about 3 whistles. Retain the water if you wish to have some gravy
  • Dry roast the corriander seeds, pepper corns, cummin seeds, and red chillies till they give out a nice aroma. Once done, cool for a while and then, grind to a fine powder. Keep aside.
  • Heat the oil in a pan, add the curry leaves and mustard seeds. Wait till the seeds splutter.
  • Add the garlic and let it . Then add the onions and saute till the onions turns translucent.
  • Now, add the coconut, turmeric and the powder. Saute, till the oil has started leaving the sides
  • Now, add the chickpeas and the Ivy gourd and mix well.
  • Add the salt, jaggery and tomatoes and give it a good mix. Cover and cook for about 7 minutes.
  • If required, add some water from the boiled chickpeas.
  • Serve hot with rice or chapattis.

Pork Chilli!

IMG_2132

I am absolutely overjoyed as I write this post. More, because I cooked this dish is my own and when I began, I had absolutely no idea of how it would turn out. But look at the pictures and they will tell what a good job I did. I have written earlier on the blog on how pork is every Mangaloreans comfort food and no big or small occasion is ever complete without it. Though, pork chilli may sound an authentically Chinese dish but this one is genuinely Mangalorean. Let me make my case

Every Mangalorean wedding has an interesting function preceding it. This function is called ‘Roce’. For the seekers of the truth, this is a function held on the day before the actual wedding. This is where coconut milk and oil is applied to the soon-to-be- bride or groom; the bath following the ritual symbolizing the last bath as a singleton. It is a very fun event and I seriously recommend you to attend one if you happen to be invited. And yes, how can I tell you about a roce and not tell you about the food? In the olden days, when food was traditionally cooked at home usually consisting of rice, variety of vegetables along with mutton polov and pork chilly. It also depended on how much the host could afford. With the passage of time, the menus started getting creative and contemporary fare started showing up. Two things remained constant though, the mutton polov and pork chilly. Like friends, who had sworn to stand by one  another through the test of time. I will do another post on the virtues of the mutton polov; for today, we shall focus on the pork chilly. Doesn’t the name ‘…… Chili’ make it sound it sound very Chinese.  It does. For a while I too, was misled to  imagining that this was another produce from across the border. But, I frankly haven’t seen this version being served anywhere else than a Mangalorean roce. The other thing is unlike other Mangalorean recipes, this one is not easy to find. I have found different versions as well; probably attribute it to the caterer. That made it difficult to ascertain one texture and base for the meat. After every roce, I’d come back home much more determined to try the pork chilli. With no proper recipe to back me, I knew I had to fend for myself to get this one right. The one that would make both the Chinese and the Mangalorean grannies proud. So I started researching for the recipe. On a recent trip to Mangalore, I even picked up a book, known to be the bible of Mangalorean cooking. A must have for every new Mangalorean bride. I was disappointed. The book didn’t contain the recipe.

Then, a few months back I went to another roce function. The pork chilli was there. This one was slightly different from the ones I had, there was something different. The texture soft and flavors though predominantly Chinese had that hint of extra chilli a typical Mangalorean trait. This not only gave it that extra bite but served as a nice cushion against the crisp but superbly cooked meat. For me, it was the dish of the day. I walked up to the caterer and complimented him firstly putting up a winner. I then quizzed him on the texture and cooking. Thankfully, unlike other Mangalorean aunts who hold their recipes close to their chest, he was pretty fort right and told me that he preferred baking the pork for some time to give it that contrast in textures. Another trick he told me is to get meat with some fat; that would help in marrying the flavours.

With a base to begin, I was now looking at the opportunity to cook. I thought it would be nice if I could marinate the meat for a while. I love the aroma of marinating meat. It somehow takes the flavors of the meat to another level. Marination done, I carefully laid the pork pieces on a baking tray and aligned the settings. Twenty minutes down and the house almost smelt divine. Baking the meat proved to me a master stroke. Later, as the bits started falling into place (or should I say into the gravy), I realized that this was that one dish I had been waiting for.  I guess, I more or less made it the the caterer.

Dinner that night was bliss. Pork to me is not sorpotel or vindaloo anymore. As I ate, I recollected something I read. It said that the poet and pig are appreciated only after their death. Not sure about the poet, but i can surely agree about the pig. 

IMG_2136

Pork Chilli

Ingredients:

  • 500 grams pork, cut into bite sized cubes- Refer note below
  • 120 grams bell peppers, cubed – Suggestion is use 1 each of green, red, yellow 
  • 1 bunch spring onions, finely chopped
  • 3 tablespoons garlic, mince
  • 1 tablespoon ginger, minced
  • 2 green chilli, finely chopped
  • 1 tablespoon, red chilli paste
  • 1 teaspoon, white pepper powder
  • 4 tablespoons, tomato ketchup
  • 4 tablespoons, soya sauce
  • 2 tablespoons, oyster sauce
  • 2 tablespoons, vinegar
  • 2 tablespoons, oil
  • 1 tablespoon cornflour mixed with 70 ml water to make a slurry
  • Salt- to taste
Procedure:
  • Wash the meat and pat it dry. In a bowl, whisk together half the soya sauce, vinegar, white pepper powder and some salt. Add the meat to this marinade and mix well. Make sure the meat pieces are well coated with the marinade.
  • Preheat the oven to 100 C
  • Line the meat pieces on a baking tray and bake in a the oven at 180 C for 40 minutes. Depending on the type of your oven, you may need to increase or decrease the baking time. But, generally 40 minutes is good enough. Once meat is done, remove and keep aside to cool.
  • Heat oil in a pan on a medium flame. Add the ginger, garlic and saute till garlic has turned brown, but not burnt.
  • Add the onions along with the greens with  and saute for a minute. 
  • Now, add the red chilli paste and give it a good mix. If the paste is sticking to the pan, sprinkle a few drops of water.
  • Add the tomato ketchup, remaining soya and the oyster sauce and mix well.
  • Now, add in the bell peppers and coat them well with the gravy.
  • Lastly, add the pork pieces, salt and mix well.
  • Now, add the cornflour slurry and give it one last mix. 
  • Garnish with spring onion  and serve hot with fried rice.

Of Chicken 65 and Rajnikanth Flicks

Today’s dish Chicken 65, is the second best thing to come out from Chennai. The first being Rajnikanth.  And just like Rajnikanth, it is humble, is unassuming, has a huge fan base, and above all, manages to quietly steal the show from everything else at the table. There is a bit of history thrown in behind the invention of the chicken 65, which goes something like this.

Many years ago, a customer walked into a small little restaurant in Chennai and asked to be served a meal. Now, it was around closing time; but not wanting to send back a hungry customer, the owner ordered the chef to quickly prepare something from whatever was available in the pantry. The chef did and the customer left with a grateful heart only to come back the next day and ask that the same dish be served to him. This went on for a couple of days and then, the owner decided to feature the dish on his regular menu. The  menu already had 64 items and this went on to become the 65th item, thus prompting the name “Chicken 65”. 

Another story goes back to the pre-Independence era, when the British soldiers who frequented the military café in Chennai. They had a favorite dish whose longish name they couldn’t pronounce and there ordered it by saying “Chicken 65”. The 65 apparently rhyming with the last name of the dish. Sounds interesting right?

Food does becoming interesting when there is a story to back it up.  But this dish is not just about the story behind it. It is about its simplicity in every aspect making it a case in point for cynics who don’t buy the argument that simple dishes can be tasty as well. Picture this, you marinate the chicken, cover it with batter and fry it, toss it in the sauce. Not too difficult, right? Yet, every bite will make you swoon, towards the end you will be full, but not satisfied and in all probability will have you asking for more. Pretty much like a Rajnikanth classic flick where you know you cannot go wrong.

I had initially not planned to make Chicken 65. I had boneless chicken in the fridge and in all probability would have gone in for a Chinese meal, but as the proverbial twist in the tale, the majority voted against Chinese and I decided to make Chicken 65. The only real effort was staying away from the crisp fried chicken and proceeding to the preparation of the gravy. I was pretty thrilled at the result simply for the fact that I got it right in the first go. My suggestion is don’t make it with a lot of gravy; it just enough to coat the chicken pieces  and yet give you that feeling of it lingering on your pallete.

The feeling of ecstasy and satisfaction you will derive be unparalleled I derived from it was unparalleled. Try it, I’m sure you enjoy it as well.

C652_2120


Chicken 65


Ingredients:

For marinating the Chicken 

  • 550 grams chicken, cut into medium sized pieces (you could either use boneless or with bone)
  • 2 teaspoons, red chilli powder
  • 1 teaspoon, turmeric powder
  • 1 teaspoon, crushed pepper
  • Juice of 1 lemon
  • Salt to taste

For the batter

  • 6 tablespoons, rice flour
  • 2 tablespoons, cornflour
  • 1 egg, beaten well
  • Salt- a pinch
  • Oil, sufficient to fry the chicken pieces

For the gravy:

  • 100 grams, Greek yoghurt, whisked well
  • 2 teaspoons, garlic paste 
  • 1 teaspoon, ginger paste
  • 3-4 green chillies, finely chopped
  • 1 Sprig, Curry leaves
  • 1 teaspoon, cumin seeds
  • 1 teaspoon, red chilli powder
  • 1 teaspoon, turmeric powder
  • 1 teaspoon, garam masala powder
  • 1 teaspoon, corriander powder
  • Juice of half a lemon
  • 2 tablespoons, oil
  • Salt- to taste

Procedure:

  • Wash the chicken, pat it dry and marinate it with the red chilli powder, turmeric powder, pepper and lemon juice. Do not add the salt at this time. Keep it aside for an hour.
  • Sieve together the rice flour, and corn flour and the salt and keep aside. Beat the egg well.
  • Now heat the oil on medium heat. 
  • Line two bowls one with the rice flour and corn flour and the other with the egg.
  • Add the salt to the chicken pieces and mix well. Take each piece of chicken and coat well with the egg and the flour mixture (in that order) and fry in the oil till each piece stands out separately and is golden brown in colour.
  • Take out and drain on a absorbent paper. While we proceed to make the sauce.
  • In a deep bottom pan, heat the oil (mentioned under the heading “for the gravy“).
  • Once it heats up, add the curry leaves and the cumin seeds and allow them to crackle.
  • When the curry leaves release aroma, add the ginger, garlic paste, green chillies and saute well.
  • Add the spice powders and mix well. Sprinkle a few drops of water so that the powders don’t stick to the bottom of the pan.
  • Now, add the yoghurt, salt and mix well to integrate the spice powders.
  • Finally add in the fried chicken pieces and mix well so that the yoghurt gravy is fairly dry and the chicken pieces are coated well.
  • Transfer to the serving plate, sprinkle lemon juice and serve hot.

Vorn- Manglorean Green Gram Pudding- Celebrating 100 likes on the facebook page.

A very special dish for a very special occasion. This recipe is by none other than the original masterchef herself! Yes, it my mums recipe and a Mangalorean classic, Vorn (pronounced- War-rn). So then, what’s the special occasion? Well friends, my Facebook page has reached 100 fans and that calls for a celebration, doesn’t it? Remember, I told you special dish for a special occasion. Thanks a ton, dear readers, without each of you being there to cheer me on, this would not be possible. And yes, a special mention to my mum and sister who have been the backbone of this blog. Tasting, criticizing, cheering, suggesting and almost everything backstage is done by them and their input goes a long way in deciding what goes on the blog and what is left out.

It was only obvious that I would choose Vorn for this post. It is a sweet dish reserved for very special Mangalorean functions. I remember, sometime back I attended about 3 weddings in 4 days and then there was roce (which is the pre-wedding function) & every roce had vorn. Just goes to show what it means to us Mangaloreans. I remember my mum and even my grand mum making vorn in a large vessel that was specially reserved only for that purpose. As with most Mangalorean recipes, this one too doesn’t have a standard recipe, each household claims theirs is original and authentic. We’ll leave it to the food historians to investigate.
Now, vorn is best had when it is piping hot, straight out of the cooking vessel. Whenever, mum makes it, I readily volunteer to do the tasting bit. When I was younger, I would deliberately sneak into the kitchen and ask that I taste the vorn at almost every stage of the cooking process. Complex as it may sound, it’s fairly simple to make and doesn’t require any alchemy. Just a few household ingredients that are readily available in the everyday pantry and your set to wow your family, friends or guest. And if you are of the diet conscious sorts who cringe at the mere mention of desserts, worry not. This one’s for you as well since unlike other oil/ ghee laden desserts this one doesn’t use any fat. Indulgence at its best!!
And before I began writing, I promised my self that I would keep the post short and sweet. The dish has enough magnanimity to carry it through. As I always believe, food tastes best when eaten with love and shared. I do hope my dear friends you will try this recipe and share it with your family and those who you love.
Vorn 2
Vorn- Mangalorean Green Gram Pudding
Ingredients:
  • 200 grams Moong dal (Indian Greem Gram)
  • 150 grams jaggery
  • 60 grams rice paste (Instructions below)
  • 80 grams mixed dry fruits (Cashewnuts, Raisins, Pistachios), roughly chopped
  • 120 ml thick coconut milk
  • 4-5 green cardamom, powdered
  • 300 ml water
Procedure:
  • Dry roast the moong dal in a pan till it is golden brown on all sides. Once its brown, rinse twice under running water.
  • In a deep vessel, boil the dal and the water together. The texture of the dal should be whole but not entirely mashed.
  • Once the dal reaches this stage, add the jaggery and stir well. The jaggery should melt entirely.
  • Add the cardamom powder and the mixed dry fruits. Keep stirring well so that there are no lumps in the liquid.
  • To make the rice paste, soak (any variety of short grained) rice in water for about half an hour and then grind to a liquidy paste. Add this paste to the vorn mixture.
  • When you add the rice paste, the vorn will attain a thick consistency. Reduce the heat and add the coconut milk. Stir well.
  • Ganish with dry fruits and serve hot.

Mince Cutlets!!

There are many blessings that life bestows on all of us. Making and choosing friends is one of them.

The genesis of this post goes back about a decade and half, when I got admission to St. Andrew’s College, Bandra. On the first day of college, I was a nervous wreck. New institute, new places and the fact that I would be interacting with strangers gave me nightmares. But then, along the way, I met the three most diverse, mad and yet strangely, the most funniest people in my life. These are the friends I made in college and today, a decade and half later, careers and commitments have taken us to separate corners of the globe but thanks to innovations in social media, we are always an email, call or if need be a flight away from each other. Ironically, if you would put together the initials of our names it would be ‘BEER’; one of the E’s representing me of course.

Mince Cutlets 1

So, why am I telling you about my friends and college days? Firstly, it was friendships day celebrated earlier this week and secondly the dish for today is one that we almost spent our entire college life on. Mince cutlets. For those you who know and have been to Bandra (where my college was), you would know that it’s one of the few areas in Mumbai that is heady concoction of the new and old worlds. One of the best things of Bandra is the large number of schools and an equally large number of small bakeries that (still, I guess) churn out all sorts of baked goodies both sweet and savory. The good thing was that the products were reasonably cheap and thankfully the portions large enough to satiate the growling stomachs of young college students. Now, each group in college had its own preferred bakery and so did ours. A few furlongs away from college was an Irani bakery that the ‘BEER’ group would frequent; run by an uncle who resembled the biblical character Noah and just like Noah didn’t seem to age. We visited the place more out of compulsion and need to look good eating joints that wouldn’t deplete the pocket money our parents gave us. One of the things we loved having from this place was the mince cutlets. Half a dozen medium sized cutlets at about 10 odd rupees was a steal. As time passed, uncle almost instinctively knew that along with other stuff an unsaid order was for the plateful of cutlets, at times he would even sneak an extra one much to our delight. We would pack the cutlets and rush off to the sea shore close by and sit there and munch on the cutlets while planning on how to take on the world after we graduate. Those were wonderful times, when we didn’t have to depend on facebook for our friends birthday reminders and TV meant Doordarshan. I was chatting with a friend a few days ago and we both spent hours recollecting those awesome times, mischief done and of course, the cutlets. Post that call, I instantly knew the agenda for my friendship day post.

As you would have realised by now, this is a friendships day post. Needless to say, one post would not be enough to chronicle the warmth of friendship; I tried and put down as much as I can.  And to get as close as I could to relive those memories, I felt there was nothing better than the Mince Cutlets. I have keeping it as close to uncle’s recipe as I could, the taste was more or less there, as they say originals are originals and can’t be replicated.

Serve them with the main course or as an entrée, they fit anywhere into the menu. Better still, have them with ‘BEER’

Cheers folks!!! And a happy friendship day to each of you. Love well, eat well!!!

Mince Cutlets 2

Mince Cutlets

Ingredients:

  • 400 grams Chicken Mince
  • 1 small onion, grated
  • 2 green chillies, finely chopped
  • 3 tablespoons rice flour
  • 1 large (or 2 small) potatoes, boiled and mashed
  • 1 tablespoon garlic paste
  • 1 tablespoon ginger paste
  • 2 tablespoon red chilli powder
  • 1 tablespoon turmeric powder
  • 1 tablespoon garam masala powder
  • 2 tablespoon chaat masala powder
  • 1 egg, lightly beaten, for frying
  • Oil for frying
  • Breadcrumbs for coating
  • salt to taste
Procedure:
  • Wash the mince well and add the grated onion, chillies, potatoes, garlic and ginger pastes, red chilli, turmeric & garam masala powders. Mix well.
  • Refrigerate for an hour. This is to ensure that there is no moisture in the mince.
  • After an hour, add the rice flour and the chaat masala powder, salt and give it a thorough mix.
  • Lay out two plates separately with  bread crumbs and beaten eggs.
  • Now wet your hands a little and take a little of the mixture and shape into quinelles, patties or into a shape of your choice.
  • Dip each into the egg, and then roll well in the breadcrumbs.
  • Heat oil in a pan and fry till golden brown. Once done, take out on an absorbent paper
  • Serve hot with chutney or sauce.